Why Chickens?

My photo
NH, United States
Last year, I bought a chicken coop that was made by someone that I love dearly and decided to raise some chickens. Well... we'll see how this quest develops as Spring fades into Summer and the chicks arrive in early June! Check out my YouTube channel www.youtube.com/fbideas for the most recent videos I've posted!

Tuesday, June 14, 2011

June 14th - Chick Ready

Everything is set for the chicks to arrive either today or tomorrow.  I had ordered the chick starter kit from http://www.mypetchicken.com/ when I ordered the chicks back in January.  It included 10 panels that are 24 inches high that have slots in them so they fit together and they recommended that most people start with 6 panels when the chicks arrive. 

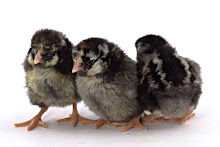
After putting them all together to see how big the pen was going to be once the chicks start to grow, we decided that 6 seemed more manageable to maintain the starting temperature of approximately 95 degrees.

The garage floor is covered with plastic, then there is about 2 inches of the pine shavings for cushioning and for the first day or two it will be covered with paper towels so the chicks don't slip around too much.  It also will allow them to find their food more easily until they recognize what it looks like.

In the beginning, the most important thing will be water as I unload them from the shipping box.  If you look closely in the photo, you'll see that I've added rocks into the tray so that if they fall asleep while drinking, they don't drown!  Sounds terrible, but I guess it does happen.  Then once they've all figured out how to drink and where to find it, I'll start to put down some food on the paper toweling and see how that goes.  All I need now is the chicks!

Saturday, June 11, 2011

June 7th - Roof for the chicken run

DRAT!!
We found another use for that foolish blue tarp!  Actually, believe it or not, we went out and purchased an even BIGGER one!
Eventually, the roof for the run will be poultry wire with maybe some shade cloth of some sort over a portion of it, but we've run out of oomph!
We've secured it with bungee cords temporarily and there are 12 foot 2x2 stringers across underneath it for wall stability.
Now the hawks and owls can't swoop into the run and it'll keep out Racoons or other critters that might scale the hardware cloth walls.  It's amazing that you don't think about RAIN when you're doing something like this and it's been 90+ for the past two weeks!

Got to get this project done because the 13 baby chicks will be arriving on June 14th or 15th and that will bring a new level of OMG WHAT HAVE I DONE!  You'll actually notice that the past 5-6 posts were all done this evening, June 11th, so that I could catch everyone up on what's been happening!

June 5th - Chicken run erected and a New Roof

Bob and I got the side walls erected on Saturday after the hose was repaired.  Seems like all the weekends are running together as we draw closer to the finish line.

Sunday, our Son Jason and Genna arrived to put the shingled roof onto the coop.  It'll be nice to get rid of that big blue tarp that's been draped over the roof all Spring!  Jason also took the screws out of that string of windows along the top of the coop so that there could be more ventilation inside.  Now there is an open window on all 4 sides and it's a little cooler in there.

The shingles match the house since they were leftovers from when we built a few years ago.  I'm so glad that the roof is done and I don't have to worry about leaks into the chicken house!

Got to show you the before and after photos of this roofing job!  Thanks to Jason, another job is done by the Mission Man!  Check out his website www.missionman-nh.com, he does REALLY great work if you need a home handyman!

BEFORE New Roof

AFTER New Roof

June 3rd - 5th - Assembling the Chicken Run

Seems like forever since we stacked those panels against the side of the chicken coop, and "the girls" are getting tired of being out for the day in the dog cage, but the weather has been unusually HOT and humid this year and it's easier to move them into the shade that way.  90+ degrees is not fun when you're wearing chicken feathers.

We trenched out as deep as we could go with the backhoe on the tractor one night after work and got this far before we struck "our lawn irrigation system" in the last 10 feet!  That stopped the progress until we could get to Lowe's and get the goodies to repair the hose.  The good news is that it seems to be coming together nicely.

June 2nd - Planting seed potatoes in a shopping bag!

Not only am I concentrating on chickens, but I'm growing a garden as well.
I saw this technique on another YouTube video and thought it would work for us since the best thing we seem to grow on our property is ROCKS
I took a bunch of 99 cent recyclable grocery bags, cut holes into the bottom along the seams, cut pieces of nylon window screening to fit in the bottom and up the sides so the soil wouldn't fall out.  I then added 3-4 inches of organic garden soil, put the 6 seed potato slices on top with the eyes facing up and covered with another 2-3 inches of soil.  Next, I rolled down the sides of the bag to just above the soil line so the topsoil could get direct sunlight and watered until it ran out the holes I had cut in the bag.
Once the plants reach 5-6 inches tall, I'll add more soil to almost cover the plant and raise the sides of the bag each time until the sides are all the way up. The potatoes will grow off the stalk in the soil and when they're ready to be harvested, I'll just dump the soil and potatoes into a wheelbarrel so it's easy to find them.  More on this process as the days slip by.

May 28th - Building a chicken run so they can run

Hooray, it's the long weekend finally!  No rest for us though, we've got a run to build.  My husband is SO WONDERFUL!  He's engineered it so that we're creating 11 panels that will screw together.  That way, if one panel gets damaged we can remove it and put new wire in without dismantling the entire yard.  While Bob cut and assembled the frames, I painted on the first coat of white.  I'll do the second coat when they are all assembled together.


We built 3 smaller frames to go under the chicken coop and used 1/2" hardware cloth.  Before putting those on, we added several inches of "washed sand" under the coop and sprinkled DE onto that.  Hopefully, since it will be shady under there and a place to get out of the rain, this is where they'll choose to take "dust baths".  Next we added more hardware cloth UNDER the frames, added larger rocks AND then 3/4" crush run on top so it looked more finished.

Starting to look pretty good for a chicken coop! After 3 LONG days of working on this, we were both so tired we just couldn't bring ourselves to assemble it all.

Now I know why farmers go to bed so early!  They're wiped out from all the hard work!

May 25th - Rhode Island Red - Henrietta lays an egg!

After just a few days of having "the girls" on the back porch, we finished up securing the Coop so that no unwelcome visitors could get in and they couldn't sneak out!

I loaded up the coop with shavings, painted the roosts with DE (Diatomaceous Earth) to keep the bug population down, sprinkled it all over the shavings and into the nesting boxes as well.  I don't know if they have any lice or other varments living in their feathers (I haven't had the courage to look), but if they do... I firmly believe that the DE will cure them.

After hanging the water and food, the girls moved into their new digs.  I think they actually SMILED at me!  Right, I know what you're thinking...I'm smelling too much DE!  After just a few minutes in the deeper shavings, Henrietta started to scratch and circle into one area in the corner.  They'd been laying eggs in the dog crate in one corner so I picked her up and put her into a nesting box.  Look what happened!

You must admit... that is pretty cool :)  Talk about videotaping at just the right moment!

May 19th - From the Fire into the Frying Pan!

Look good don't they?  My first two eggs!  Yes, of course I can count... the bottom egg is a large egg from the supermarket.  I put it there to get a comparison of size for what my two little hens are laying.  Not bad! 

The thing I'm finding comical with all this egg stuff is that Gertrude lays a lighter color egg each day and just a little later in the day than Henrietta.  Henri's are always darker shelled, and slightly rounder than Gerti's.  It's actually fun to see which one has given me the latest gift.

 I decided to crack open the first two eggs the next morning and had them scrambled. Everyone keeps telling me that "fresh eggs" taste so much better than "store bought" eggs and I have to agree.  The texture is also different.  When scrambled, the fresh ones have a "firmer" consistency and aren't as watery as the ones from the store.